大家好~本文使用WebGPU和光线追踪算法,从0开始实现和逐步优化Demo,展示了从渲染500个2D物体都吃力到流畅渲染4百万个2D物体的优化过程和思路
完整代码在这里
目录
我们对Demo提出下面的要求:
暂时只渲染一种2D物体:圆环
内存占用小
剔除被遮挡的物体
放大物体时无锯齿,达到矢量渲染的效果
我们最终能够流畅渲染4百万个圆环
性能指标:
画布大小为:width=512, height=512
45 FPS左右,也就是每帧花费21毫秒
内存占用211MB
硬件:
Win10操作系统
Canary浏览器
RTX2060s显卡
下面让我们从0开始,介绍实现和优化的步骤:
思考如何实现与渲染相关的需求
现在,我们来回顾下与渲染相关的需求,从而确定渲染算法:
放大物体时无锯齿,达到矢量渲染的效果
要实现该需求,可以用参数化的方法来表示物体,如用圆心坐标、半径、圆环宽度 来表示一个圆环;
然后可以根据下面的公式判断一个点是否在圆环上:
let distanceSquare = Math.pow((点-圆心坐标), 2)

let isPointInRing = distanceSquare >= Math.pow(半径, 2) && distanceSquare 剔除被遮挡的物体


要实现该需求,首先圆环加上“层”的数据;

然后遍历所有圆环,判断像素在哪些圆环上;

最后取出最大“层”的圆环,将它的颜色作为像素的颜色


**选择渲染的算法**

有两种渲染算法可选择:光栅化渲染、光追渲染


根据我们之前对渲染需求的思考,我们应该选择光追渲染作为渲染算法


典型的光追渲染会依次执行下面两个pass:

1、光追pass

从相机向每个像素发射射线,经过多次射线弹射,计算每个像素的颜色

2、屏幕pass

将屏幕光栅化,渲染每个像素的颜色


其中光追pass是在CS(计算着色器)中进行,屏幕pass是在VS(顶点着色器)和FS(片元着色器)中进行


因为这里是2D物体,所以需要对光追算法做一些简化:

射线不需要弹射,因为不需要计算间接光照;

因为物体直接就在屏幕上,所以不需要计算射线与物体相交,而是按照参数化公式计算像素是否在2D物体上


# 2、实现内存需求


现在来考虑如何实现“内存占用小”的需求


这里只考虑CPU端内存,它主要存放了场景数据,包括圆环的transform、geometry、material的数据


我们使用ECS架构,将物体建模为gameObject+components

这里的components具体就是transform、geometry、material这些组件


按照Data Oriented的思想,每种组件就是一个ArrayBuffer,连续地存放组件数据(如transform buffer连续地存放圆环的localPositionX, localPostionY, layer(层)数据)


component为对应buffer中数据的索引


通过ECS的设计,我们就将场景数据都放在buffer中了。在初始化时,只根据最大的组件数量,创建一次对应的组件buffer。这样就实现了内存占用最小的目标


# 3、渲染1个圆环


现在来渲染出一个圆环,也不考虑剔除


我们依次实现下面两个pass:


**光追pass**


我们需要传入下面的场景数据到CS中,CS中对应的数据结构如下:
struct AccelerationStructure { worldMin : vec2, worldMax : vec2,
instanceIndex: f32, pad_0: f32, pad_1: f32, pad_2: f32, }
struct Instance { geometryIndex: f32, materialIndex: f32,
localPosition: vec2, }
struct Geometry { c: vec2, w: f32, r: f32, }
struct Material { color: vec3, pad_0: f32, }
struct AccelerationStructures { accelerationStructures : array, }
struct Instances { instances : array, }
struct Geometrys { geometrys : array, }
struct Materials { materials : array, }
struct Pixels { pixels : array> }
struct ScreenDimension { resolution : vec2 }
@binding(0) @group(0) var sceneAccelerationStructure : AccelerationStructures; @binding(1) @group(0) var sceneInstanceData : Instances; @binding(2) @group(0) var sceneGeometryData : Geometrys; @binding(3) @group(0) var sceneMaterialData : Materials;
@binding(4) @group(0) var pixelBuffer : Pixels;
@binding(5) @group(0) var screenDimension : ScreenDimension;
struct中的pad用于对齐


sceneAccelerationStructure包含圆环的包围盒数据,作为加速相交检测的加速结构。其中worldMin、worldMax为世界坐标系中的min、max


sceneInstanceData、sceneGeometryData、sceneMaterialData为场景中所有的组件数据(sceneInstanceData为Transform数据)


instanceIndex, geometryIndex, materialIndex为对应组件数据的索引


pixelBuffer是光追pass的输出,用来存放像素颜色


screenDimension存放画布的width、height


这里为了简单,没有传相机数据


在执行CS时,启动画布的width*height个work groups,从而让每个像素对应一个work group,并行执行每个像素

相关代码为:
const passEncoder = commandEncoder.beginComputePass();
...
passEncoder.dispatchWorkgroups(width, height);
下面我们来看下CS中计算每个像素颜色的相关代码:
struct RayPayload { radiance: vec3, }
struct Ray { target: vec2, }
struct RingIntersect { isHit: bool, instanceIndex: f32, }
fn _isIntersectWithAABB2D(ray: Ray, aabb: AABB2D) -> bool { var target = ray.target; var min = aabb.min; var max = aabb.max;
return target.x > min.x && target.x min.y && target.y bool {
var target = ray.target;

var c = geometry.c;
var w = geometry.w;
var r = geometry.r;

var distanceSquare = pow(target.x - c.x, 2.0) + pow(target.y - c.y, 2.0);

return distanceSquare >= pow(r, 2) && distanceSquare RingIntersect {
var intersectResult: RingIntersect;

intersectResult.isHit = false;

var as: AccelerationStructure;

//遍历所有的圆环,判断点在哪个圆环上
for (var i: u32 = 0u; i , ray: Ray, intersectResult: RingIntersect)->bool {
var instance: Instance = sceneInstanceData.instances[u32(intersectResult.instanceIndex)]; var materialIndex = u32(instance.materialIndex);
var material:Material = sceneMaterialData.materials[materialIndex];
(*payload).radiance = material.color;
return false; }
fn _handleRayMiss(payload: ptr)->bool { (*payload).radiance = vec3(0.0, 0.0, 0.0);
return false; }
fn _traceRay(ray: Ray, payload: ptr)->bool { var intersectResult: RingIntersect = _intersectScene(ray);
if (intersectResult.isHit) { return _handleRayHit(payload, ray, intersectResult); }
return _handleRayMiss(payload); }
@compute @workgroup_size(1, 1, 1) fn main(@builtin(global_invocation_id) GlobalInvocationID: vec3) { var ipos = vec2(GlobalInvocationID.x, GlobalInvocationID.y);
var resolution = vec2(screenDimension.resolution);
var pixelColor = vec3(0.0, 0.0, 0.0);
//取像素中心为像素坐标 var sampledPixel = vec2(f32(ipos.x) + 0.5, f32(ipos.y) + 0.5); //获得屏幕坐标系中的像素坐标 var uv = (sampledPixel / resolution) * 2.0 - 1.0;
//像素坐标就是点坐标(因为没有使用相机,所以它就相当于在世界坐标系中) var target = uv; /* 如果使用了相机的话,需要将其转换到世界坐标系中: var target = 相机的视图矩阵的逆矩阵 * 相机的投影矩阵的逆矩阵 * uv; */
var payload: RayPayload; payload.radiance = vec3(0.0, 0.0, 0.0);
var _isContinueBounce = _traceRay(Ray(target.xy), & payload);
pixelColor = payload.radiance;
var pixelIndex = ipos.y * u32(resolution.x) + ipos.x; pixelBuffer.pixels[pixelIndex] = vec4(pixelColor, 1.0); }
看代码应该就能理解了吧,就不说明了


**屏幕pass**


在VS中,使用一个大的三角形包含整个屏幕,代码为:
struct VertexOutput { @builtin(position) Position: vec4 , @location(0) uv: vec2 , }
@vertex fn main( @builtin(vertex_index) VertexIndex: u32 ) -> VertexOutput { var output: VertexOutput; output.uv = vec2(f32((VertexIndex (output.uv * 2.0 - 1.0, 0.0, 1.0);
return output;
}
在FS中,读取光追pass输出的像素颜色,代码为:
struct Pixels { pixels: array> }
struct ScreenDimension { resolution: vec2 }
@binding(0) @group(0) var pixelBuffer : Pixels; @binding(1) @group(0) varscreenDimension : ScreenDimension;
@fragment fn main( @location(0) uv: vec2 ) -> @location(0) vec4 { var resolution = vec2(screenDimension.resolution);
var bufferCoord = vec2(floor(uv * resolution));
var pixelIndex = bufferCoord.y * u32(resolution.x) + bufferCoord.x;

var pixelColor = pixelBuffer.pixels[pixelIndex].rgb;

return vec4(pixelColor, 1.0);
}
# 4、测试渲染极限
现在我们来渲染500个圆环,测试下FPS
渲染结果如下图所示:
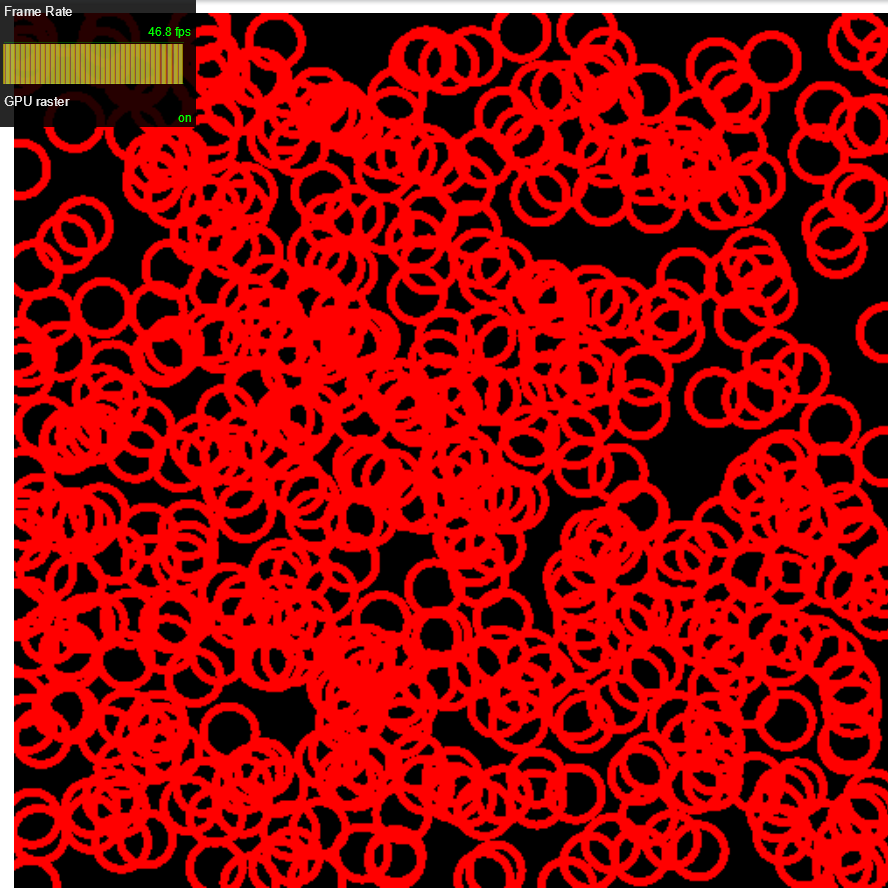
发现性能问题:现在FPS为45,低于60!
我们来分析下CS中的性能热点:
首先在粗粒度上确定热点范围
我们将_intersectScene函数中的for循环注释掉,再次运行Demo,FPS提升为60
这说明_intersectScene的for循环这块是性能热点
我们来分析这块代码:
现在每次遍历都会执行arrayLength函数,而它的性能较差。因此将其提出来只执行一次
代码修改为:
var length = arrayLength(&sceneAccelerationStructure.accelerationStructures); for (var i : u32 = 0u; i
BottomLevel用来保存所有圆环对应的包围盒、instanceIndex


TopLevel的数据类型如下:
type wholeWorldMinX = number type wholeWorldMinY = number type wholeWorldMaxX = number type wholeWorldMaxY = number
type leafInstanceOffset = number type leafInstanceCount = number type child1Index = number type child2Index = number
type topLevel = Array
TopLevel用来保存BVH节点的包围盒、节点包含的AABB在BottomLevel数组中的索引(如果该节点不是叶节点,则leafInstanceCount=0)、子节点在topLevel数组中的索引


然后将加速结构传到CS中,CS中对应数据结构如下:
struct TopLevel { worldMin : vec2, worldMax : vec2,
leafInstanceOffset: f32, leafInstanceCount: f32, child1Index: f32, child2Index: f32 }
struct BottomLevel { worldMin : vec2, worldMax : vec2,
instanceIndex: f32, pad_0: f32, pad_1: f32, pad_2: f32, }
struct TopLevels { topLevels : array, }
struct BottomLevels { bottomLevels : array, }
@binding(0) @group(0) var topLevel : TopLevels; @binding(1) @group(0) var bottomLevel : BottomLevels;
**6.2、CPU端实现遍历BVH**


为了方便测试,我们先在CPU端实现遍历BVH;解决所有bug后,再移植到CS中


可以分别用递归和迭代来实现


考虑到WGSL不支持递归函数,所以我们只用迭代来实现

相关代码如下:
type traverseResult = { isHit: boolean, instanceIndex: instanceIndex | null }
let _isPointIntersectWithAABB = ( point, wholeWorldMinX, wholeWorldMinY, wholeWorldMaxX, wholeWorldMaxY, ) => { return point[0] > wholeWorldMinX && point[0] wholeWorldMinY && point[1] { let [ wholeWorldMinX, wholeWorldMinY, wholeWorldMaxX, wholeWorldMaxY, leafInstanceOffset, leafInstanceCount, child1Index, child2Index ] = node
return _isPointIntersectWithAABB(
    point,
    wholeWorldMinX, wholeWorldMinY, wholeWorldMaxX, wholeWorldMaxY,
)
}
let _isLeafNode = (node: topLevelNodeData) => { let leafInstanceCountOffset = 5
return node[leafInstanceCountOffset] !== 0
}
let _handleIntersectWithLeafNode = (intersectResult, isIntersectWithInstance, point, node: topLevelNodeData, bottomLevelArr: bottomLevelArr) => { let [ wholeWorldMinX, wholeWorldMinY, wholeWorldMaxX, wholeWorldMaxY, leafInstanceOffset, leafInstanceCount, child1Index, child2Index ] = node
while (leafInstanceCount > 0) {
    let [worldMinX, worldMinY, worldMaxX, worldMaxY, instanceIndex] = bottomLevelArr[leafInstanceOffset]

    if (_isPointIntersectWithAABB(
        point,
        worldMinX, worldMinY, worldMaxX, worldMaxY
    )) {
        if (isIntersectWithInstance(point, instanceIndex)) {
            intersectResult.isHit = true
            intersectResult.instanceIndex = instanceIndex

            break;
        }
    }

    leafInstanceCount -= 1
    leafInstanceOffset += 1
}
}
let _hasChild = (node, childIndexOffset) => { return node[childIndexOffset] !== 0 }
export let traverse = (isIntersectWithInstance, point, topLevelArr: topLevelArr, bottomLevelArr: bottomLevelArr): traverseResult => { let rootNode = topLevelArr[0]
let child1IndexOffset = 6
let child2IndexOffset = 7

let stackContainer = [rootNode]
let stackSize = 1

let intersectResult = {
    isHit: false,
    instanceIndex: null
}

while (stackSize > 0) {
    let currentNode = stackContainer[stackSize - 1]

    stackSize -= 1

    if (_isPointIntersectWithTopLevelNode(point, currentNode)) {
        if (_isLeafNode(currentNode)) {
            _handleIntersectWithLeafNode(intersectResult, isIntersectWithInstance, point, currentNode, bottomLevelArr)

            if (intersectResult.isHit) {
                break
            }
        }
        else {
            if (_hasChild(currentNode, child1IndexOffset)) {
                stackContainer[stackSize] = topLevelArr[currentNode[child1IndexOffset]]
                stackSize += 1
            }
            if (_hasChild(currentNode, child2IndexOffset)) {
                stackContainer[stackSize] = topLevelArr[currentNode[child2IndexOffset]]
                stackSize += 1
            }
        }
    }
}

return intersectResult
}
这里用了栈(stackContainer)来保存需要遍历的节点


本来我们可以直接通过stackContainer.push方法将节点push到栈中,但考虑到WGSL的数组没有push操作,所以这里我们就增加了stackSize这个数据,从而能够通过"stackContainer[stackSize] = 节点"来代替"stackContainer.push(节点)"


**6.3、GPU端实现遍历BVH**


CPU端测试通过后,我们将其移植到CS中


这里值得注意的是因为WGSL创建数组时必须定义大小,所以栈的大小必须预先确定且为常数


栈的大小其实就是BVH树的最大深度,我们可以先暂时指定为20


相关代码如下:
fn _intersectScene(ray: Ray)->RingIntersect { const MAX_DEPTH = 20;
var stackContainer:array;
... }
# 7、测试渲染极限
现在我们将圆环数量增加200倍,渲染500*200=10万个圆环,测试下FPS
我们将圆环的半径和圆环宽度缩小为1/10,这样方便显示
渲染结果如下图所示:
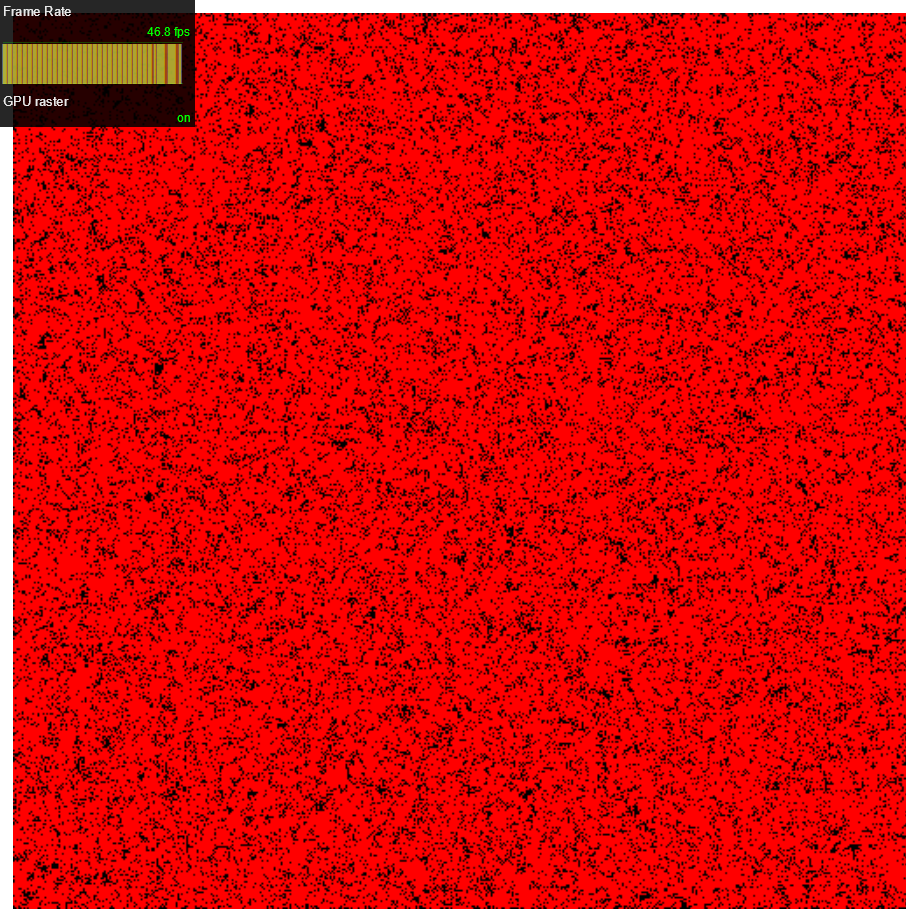
FPS没有变化
**结论**
通过引入BVH,渲染性能提高了200倍
# 8、设置workgroup_size
因为引入了BVH,需要遍历的节点数大大减少了,所以减少了显存占用
现在再次启用局部单位:
我们将work group减少为原来的1/64,将work group的size设为(8,8,1):
运行Demo后,发现FPS变为60了
理论上可以提高64倍的渲染速度
所以我们将圆环数量增加40倍,渲染10万*40=4百万个圆环,测试下FPS
结果FPS跟之前10万个时一样
**结论**
通过启用局部单位,渲染性能提高了40倍
# 9、测试内存占用
通过Chrome dev tool->Memory->Take heap snapshot,可以看到包含4百万个圆环的场景在CPU端只占用了211MB左右的内存,说明内存占用确实小
# 10、使用LBVH算法来构造BVH
现在当圆环数量为4百万个时,CPU端构造BVH需要花费100秒以上的时间!
因此,我们保持“构造加速结构”的代码不变,修改“构造BVH树”的算法为LBVH算法
它的步骤如下:
1、计算所有圆环的包围盒AABB
2、构造根节点,以所有AABB形成的AABB为该节点的包围盒
3、根据根节点的包围盒,在x、y轴方向上将其1024等分,根据AABB的中心点在哪个区域而计算出AABB在x、y轴方向上的格子坐标
4、将格子坐标转换为Morton Code
5、根据Morton Code将所有的AABB排序
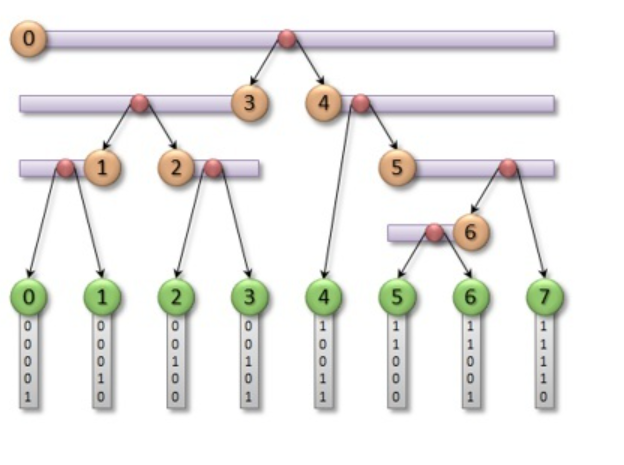
6、对于该有序Morton Code数组,我们利用二分查找出第一个不同的bit位(也即是从0变为1的index),此时我们即可将最高位为0的所有BVs归入此node(此时是root节点)的左子树,最高位为1的所有BVs归入右子树;同理,我们对左右子树按照下一个bit位来递归的处理,直到递归的处理完全部bit位,LBVH即可建立完毕
最后一步如下图所示:
**结论**
通过改为LBVH算法,构造时间降低为10秒左右,性能提高了10倍
之所以LBVH算法更快,是因为只排序了一次!
# 11、实现剔除
之前分析过剔除的实现思路:
> 首先圆环加上“层”的数据;
> 然后遍历所有圆环,判断像素在哪些圆环上;
> 最后取出最大“层”的圆环,将它的颜色作为像素的颜色
因此,可以在圆环的transform组件数据中增加layer数据(从1开始的正整数),用来表示“层”;
然后在构造加速结构BottomLevel时,读取transform组件中的layer数据,将其保存到BottomLevel数据中;
最后修改CS代码,在遍历BVH->检测到像素在圆环上时比较layer,并且不再停止遍历,而是继续遍历栈的其它节点;在遍历栈的其它节点时,如果找到了像素在其上的圆环,也不再停止
实现剔除后,运行Demo渲染1百万个圆环时FPS都才15(之前是4百万个 45 FPS),渲染性能估计降低了10倍
# 12、改进遍历BVH
我们从下面几个方面对剔除进行优化
**traverse order优化**
现在如果找到了像素在其上的圆环,会继续遍历其它节点。
我们需要减少遍历的节点数量
我们可以在构造BVH树时,为每个节点增加maxLayer数据,它为该节点包含的所有的圆环中最大的层;
然后在遍历BVH时:
检测到像素在圆环上时,将圆环的layer记录到相交结果intersectResult中;
在遍历栈中的节点的while循环中,如果该节点的maxLayer <= intersectResult.layer,则说明该节点包含的所有圆环都被遮挡了,直接continue,跳过;
另外,在遍历叶节点的所有圆环时,如果像素所在的圆环的layer==该节点的maxLayer,则说明已经找到了叶节点包含的所有圆环中的最大层的圆环,则break,停止搜索该叶节点包含的其它圆环。
通过上面的优化,可以大幅降低遍历的节点数量
**合并数据**
因为BVH树的节点需要保存maxLayer数据,而这个数据实际上是保存在TopLevel中的,对应到CS中的数据结构就是:
struct TopLevel { worldMin : vec2, worldMax : vec2,
leafInstanceOffset: f32,
leafInstanceCount: f32,
child1Index: f32,
child2Index: f32

maxLayer: f32,
pad_0: f32,
pad_1: f32,
pad_2: f32,
}
我们可以看到,因为增加了maxLayer,需要增加3个pad数据来对齐,这样浪费了显存


而占用尽可能少的显存是非常重要的,因为经过之前的分析,我们知道一个计算单位只有32KB的显存可用,超过的话就会导致启用局部单位失效!


仔细观察后,我们发现leafInstanceCount和maxLayer只需要占用<32位的字节数

我们可以让这两个数据各占16位,其中leafInstanceCount在高位,maxLayer在低位;然后将其合成一个32位f32

从而TopLevel修改为:
struct TopLevel { worldMin : vec2, worldMax : vec2,
leafInstanceOffset: f32,
leafInstanceCountAndMaxLayer: f32,
child1Index: f32,
child2Index: f32
}
这样就消除了pad数据,减少了显存占用


但是当渲染的圆环数量超过1百万个时,会出现“从leafInstanceCountAndMaxLayer中取出的maxLayer为0(应该>=1)”的bug!

这是因为leafInstanceCount(叶节点的圆环个数)过大,占用了超出了16位的字节数,从而影响到maxLayer的值!


所以我们重新分配,让leafInstanceCount占24位,maxLayer占8位,则解决了bug


注:理论上16位的leafInstanceCount可以最大为65535,但实际上我发现当leafInstanceCount>1000时,就出现了超过16位的情况!我估计是WGLSL可能占用了f32类型的数据的最高几位,导致leafInstanceCount实际可用位数<16位


# 13、测试渲染极限


现在我们将圆环数量恢复为4百万个圆环,FPS又恢复为45左右


当我们尝试渲染5百万个圆环时,遇到了“我们BottomLevel Buffer数据超出了Storage Buffer的最大限制:[128MB](https://www.w3.org/TR/webgpu/#dom-supported-limits-maxstoragebufferbindingsize)”的问题


关于这个限制,WebGPU官方有相关的讨论issue:

[Limit for the maximum buffer size](https://github.com/gpuweb/gpuweb/issues/1371)


绕过该限制的可能方案是将其拆成多个Storage Buffer


**结论**


通过traverse order优化,渲染性能提高了10倍左右


当我们尝试渲染5百万个圆环时,遇到了超出Storage Buffer最大大小的限制


# 总结


感谢大家的学习~


在本文中,我们先提出了需求;然后按照需求来设计和选择算法;然后实现最简单的版本;接着不断优化,直到达到Storage Buffer的最大大小限制为止


我们的优化的成果为:


- 通过引入BVH,渲染性能提高了200倍

- 通过启用局部单位,渲染性能提高了40倍

- 通过改为LBVH算法,构造BVH的性能提高了10倍

- 通过traverse order优化,使得剔除的性能提高了10倍左右


目前我们最多渲染4百万个圆环,因为再多就会超出Storage Buffer最大大小的限制


# 后续的改进方向


后面我们希望能够渲染千万级2D物体,可以从下面的方向改进:


- 将加速结构拆成多个Storage Buffer

- 优化构造BVH,使叶节点包含的圆环数量尽量少,且节点的包围盒尽量不重叠,这样才能提高遍历BVH的性能

可考虑使用HLBVH算法

- 优化遍历BVH:考虑并行遍历BVH、无栈的遍历

参考[Ray Tracing学习之Traversal](https://zhuanlan.zhihu.com/p/70387497)


# 参考资料


[OpenGL4.3 新特性: 计算着色器 Compute Shader](https://cloud.tencent.com/developer/article/1005948)

[Bad preformance of simple ray trace compute shader](https://www.reddit.com/r/vulkan/comments/cs4jb6/comment/excseic/)

[Optimizing GPU occupancy and resource usage with large thread groups](https://gpuopen.com/learn/optimizing-gpu-occupancy-resource-usage-large-thread-groups/)

[我所理解的DirectX Ray Tracing](https://zhuanlan.zhihu.com/p/96636069)

[并行构建BVH](https://zhuanlan.zhihu.com/p/97056642)

[Build LBVH on GPUs](https://zhuanlan.zhihu.com/p/446645910)

[Ray Tracing学习之Traversal](https://zhuanlan.zhihu.com/p/70387497)

[光线求交加速算法:边界体积层次结构(Bounding Volume Hierarchies)3-LBVH(Linear Bounding Volume Hierarchies)](https://blog.csdn.net/qq_39300235/article/details/107006830)

[WebGPU 计算管线、计算着色器(通用计算)入门案例:2D 物理模拟](https://forum.orillusion.com/topic/47/webgpu-%E8%AE%A1%E7%AE%97%E7%AE%A1%E7%BA%BF-%E8%AE%A1%E7%AE%97%E7%9D%80%E8%89%B2%E5%99%A8-%E9%80%9A%E7%94%A8%E8%AE%A1%E7%AE%97-%E5%85%A5%E9%97%A8%E6%A1%88%E4%BE%8B-2d-%E7%89%A9%E7%90%86%E6%A8%A1%E6%8B%9F)


# 欢迎浏览下一篇博文:[如何用WebGPU流畅渲染千万级2D物体:基于光追管线](https://www.cnblogs.com/chaogex/p/16557207.html)